Build Your Own Wi-Fi Jammer/Deauther Using Node MCU (ESP8266):

Hi, my dear hackers in this blog I am going to share how you can build your own Wi-Fi jammer using Node MCU (ESP8266) and also you can create multiple fake access points with it, so lets start without wasting time.
Disclaimer : This is only for educational purpose do not try to hack anyone without their permission. Hacking is illegal do it in your own lab environment.
For Windows Users:
=======================
Requirements:
(1). Node MCU(ESP 8266) : ( if you don’t have one You can buy it online )
(2). Node MCU Flasher Tool : ( Download Here )
(3). A Data Cable:
(4). Binary of the Deauther program file: (esp8266_deauther_2.6.1_NODEMCU.bin) for your NODE MCU(Download here download v2 version )
(5). Driver for your Node MCU Board: (Driver for your board written behind the board [for CH340 download here] [for CP2102 download here] )

Install the driver for your board and download all the files needed when a done we are ready to go.
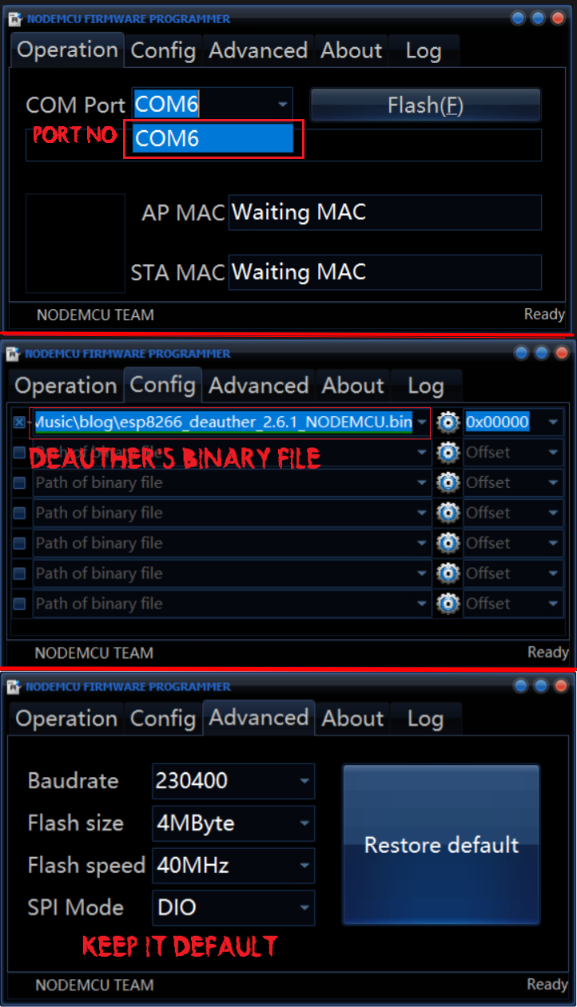
First connect the Node MCU to computer by Data Cable. Then open the Node MCU Flasher Tool, and here you have to select the “port” which the board is connected and “.bin” file the you downloaded before shown in picture below.(fig-3.0)
Now when you all done press the Flash button, now it will be start uploading the program to Node MCU and your Node MCU start blinking.

Upload could be take 4 -5 Min.(fig 5.0)

After uploading the program we are done now you have your own wifi jammer/deauther. Read the How to Use section for know how to use it.
For Linux users:
===================
Requirements:
Linux users don’t need to download any drivers for Node MCU they only need to download the “esptool” & “Deauther’s Binary” file that I linked above for windows users ( or Download here ) . Lets see how we can do that in Linux.
for Download “esptool” run the following command.(python, pip should be installed in your system).(fig-7.0)
sudo pip3 install esptool
          OR
sudo pip install esptool
Now connect your Node MCU to the system and then grab the port to which the board is connected, you can do so using following command.(fig-8.0)
sudo dmesg | grep tty
Now the final command for upload the .bin file to Node MCU.(fig-9.0)
sudo esptool.py -p /dev/ttyUSB0 write_flash -fm dout 0x0000 [deauther's binary file]
Now its done uploading now you are ready to use it. Lets see how can we use it.
How to Use:
===============
Deauth Attack:
First power the Node MCU after the powering up you will see a Wi-Fi network show in your system named as “pwned”. You need to connect to the Wi_Fi network.
Default SSID: pwned
Default Password: deauther
After connecting to the network you can access its web interface by going to the following IP address in your browser.
192.168.4.1As soon as you open this IP its show the following page first. Read the this and then press the button given below.

Now on the next page we be see the scan page where we can see all available networks and select one of then for performing the Deauth attack.

Now select a network and click of the “Attack” button given on top left corner.
After going to attack page there you will see three attacks deauth, beacon and probe choose deauth attack.

Now all the clients which connected to the following network will be disconnected and unable to connect until the deauth attack is running.
Create Multiple Fake Access Points:
You can also create multiple fake access points for do so you have create some SSIDs you can do its in the SSIDs section as shown in following image.(fig-13.0)

Now select the “Beacon” attack for create thies fake APs as show in following image.(14.0)

You can find the full project on GitHub like below: